Tag Archives: evergreen tech tips blogs

How To Fix This Page Is Not Eligible To Have A Username

How To Fix This Page Is Not Eligible To Have A Username

Facebook usernames allows your Facebook Pages to easily reach and be tagged from other Facebook users. Similarly, it’s also provides an easy page URL to your Facebook Page without complicated numbers attached at the end. This can in turn help your Facebook page grow and reach even more Facebook users. So, it’s always beneficial for your Facebook Page if it had a Facebook username in the long run.

However, it’s easier said than done. There are many users who have encountered the “this Page isn’t eligible to have a Username” error when they try to do so. And, this error mainly occurs when your page doesn’t fulfil the pre-requisites to have a page username. Here, the pre-requisites are: –

  1. Your page must have a minimum of 24 page likes.
  2. Your page must have at least one Page posts.

Might Be Useful Too: How To See Photos Liked by Someone On Facebook

Once fulfilled, you may proceed to add to add a Page Username to your Facebook page. Now, if the issue still exists, we’ve listed a workaround that may solve the problem for you. And, it’s shown hereafter. Let’s begin.

Fix this Page is not Eligible to Have a Username

Basically, the fix to this error is to assign a temporary Admin to your Page and have them set the page username. Here, the Temporary Admin is anyone that you know and trust. Also, the solution works great if the Temporary Admin doesn’t administer any other Facebook pages. Now, let’s get started.

  • The first step is to go into your Facebook Page through your Admin Account. Here, scroll down the Manage Page lists options and tap on the settings option.
  • Next, click on the “Page Roles” from the Settings options and then the “Assign a New Page Role”. After that, enter the username or email of the temporary admin and select from the search list.
  • Now, choose “Admin’ for the role and Click on “Add” to save your changes. You might have to re-enter your password to confirm your changes. This will send a notification to your temporary admins account stating that they have been given the admin rights.
  • Finally, logout of your account and login to your temporary Admins account. If you don’t have the credentials for the Temporary admin account, send the instructions hereafter to their account.
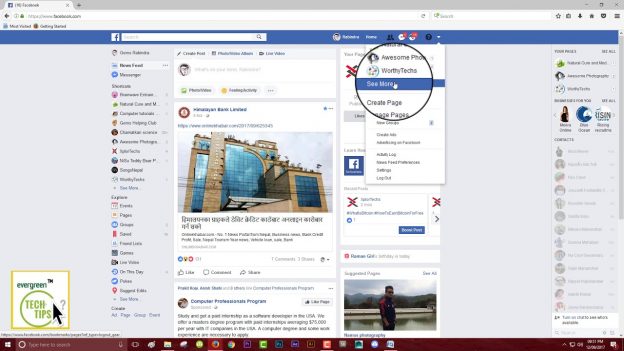
  • Again, tap on the top right menu bar and then the “Your Pages” option. Here, choose your desired page where you want to add the username.
  • After that, click on the “About” option and choose the “Create Page @username” option.
  • Now, simply enter your desired page username. It’s advised that you choose the Business/Page name itself if it’s available. This helps is simplifying the process and makes it easy for others to tag your Facebook page.
  • Finally click on the “Create Username” and you’re done. However, don’t forget to remove this account as the Admin to your Facebook Pages. Note: – you can use other Facebook accounts if one doesn’t work.


Video Tutorial To Fix This Issue:

How To Remove Write Protection From SD Card

How To Remove Write Protection From SD Card

SD Cards are one of the most accessible and cheap storage devices that are supported across a wide range of devices. Similarly, they come in many storage sizes and shapes that one can choose according to their needs and use cases. Also, their write and read speeds are pretty high and some even support the PCI and NVME interferences as well. Some of the most popular use cases of SD cards include in Cameras, Mobile devices, Laptops, handhelds etc.

Say you just found the perfect SD Card for your device but later found out that you can’t write anything in it. It’s called Write Protection and it can be pretty frustrating as you can’t add or remove things from your SD-Card. Fortunately, it’s easily fixable and we’ve listed the most popular methods that you can use to solve the issue. Let’s get started.

Remove Write Protection from SD Card As Follows:

  1. Check and Toggle the Physical Switch

The first thing that you need to check when you encounter this issue is to check the physical switch found in your SD Card. And, all SD cards come with this Physical Switch that acts as a locking mechanisms for your data. Now, just remove your SD Card and search for its physical switch. Here, you need to make sure that the slider is at the Top far away from the “Lock” marking. Once you’ve confirmed that, simply insert your SD Card again and this should have fixed your Write Protection problem.

  1. Check its Properties

Some SD Cards in Windows have a special Write Protection toggle that locks it from any changes. Now, this setting is disabled from factory but you might’ve enabled it accidently. Simply go into the File Explorer and right click your SD Card to check its properties. Here, check if the toggle for Write Protection and disable it if it’s enabled. This will instantly solve your problem. Note: – only Some SD Cards have this option for Windows so don’t worry if you can’t find the option for yours.

Also Helpful: Do This as Soon as You Get an iPhone X

  1. Clear the Cards Attributes from Command Prompt

This is the final method that you can use to remove Write Protection if the above methods fail for you. To start, you’ll need a Windows PC or Laptop and signed into the Administrator Account. Next, insert your SD card into the Laptop and follow the steps shown hereafter:

  • Right click on the start menu and open the “Command Prompt” as an administrator. Also, you can search for “Command Prompt” from the Windows Search as well.
  • Once loaded, enter this command: diskpart and hit enter. Now, confirm the app dialogue that follows.
  • In diskpart, enter: list disk This will immediately show all disks connected to your PC. After that, you need to find and verify your SD Card from the available disks. Usually, it’s at the last and has the lowest storage space in the list.
  • Now, enter the command: select disk “number” in the command prompt. Here, replace the “number” according to your SD Card’s number i.e. 1,2,3,4 etc. For example: – enter command “select disk 4” if your SD Card is labelled as Disk 4.
  • Finally, enter the command: attributes disk clear read-only and wait for the process to complete. You should see the “Disk attributes cleared successfully” message once the process completes. And, you should’ve successfully removed Write Protection from your SD card.

Also, Video Tutorial to remove SD Card Write Protection Error:

How To Update Instagram App

How To Update Instagram App on Android and iOS

Instagram is a popular Photo and Video sharing platform that was initially released back in 2011. And, its popular today for the ability to upload and edit media’s with many built-in filters to alter their look and feel. Similarly, it also allows users to organize and browse their contents through Hashtags and geographical tagging’s. All in all, it’s one of the most popular social media platform till date.

To begin, all modern smartphones both running iOS and Android will automatically update their apps in the background. But, they also provide users option to turn this feature completely off from their settings. After that, users will need to manually update each app from their respective App store. For iOS users it’s literally called the App Store and for Android users, it’s known as the Google Play Store. Now, if you don’t know how to update your Instagram App then we’ve got you covered. In this article, we’ll discuss about the ways through which you can update your Instagram app for both Android and iOS devices. Let’s get started.

Instagram Update Steps For Android

The general process for updating the Instagram App is similar for all Android version released till date. However, if your device is ancient then you may face problems while updating the App. Here, the best solution is to update the Android version of your old device or use a custom rom. With that out of the way, let learn how you can manually update the Instagram app on your Android Device.

  • The first step is to open the Google Play Store in your Android device. It comes pre-installed on all android device unless your manufacturer chooses not to do so. And if you can’t find it, open your devices alternative App store. This process can also work for such third party app stores.
  • Next, search for the “Instagram” at the search bar located at the top of the Google Play Store. You’ll also need to do the same on your third party app store at its search bar. After that, wait for the app list to load on your App store.
  • Here, you can see the Instagram App at the top of the lists and the Update button right beside it. Now, you just need to click on it to start the updating process. Also, you may need to click on the App itself to see the update icon on third party app stores. Note:- you’ll see the “Open” icon instead of the “Update” one if your Instagram App is already up to date.
  • Also, you can download the .apk file of Instagram from third party websites like Uptodown, Aptoide etc. and side-load it to update your app.

Might Be Useful: Windows Update Error encountered 0x80070422 Solved

Instagram Update For iOS/iPhones

The process to update the Instagram app on your iOS device is also similar to the process in Android devices. Here, it’s advised that you update your iPhone to its latest supported version before you proceed. This guarantees maximum compatibility for the app and your device. Now, let’s learn you to update the Instagram App.

  • Similar to Android, the first step is basically to open the App Store on your iOS device.
  • Next, tap into the search button and search for the “Instagram” App. Here, you may have to wait for a few seconds until the App lists get populated.
  • Now, Tap the Instagram App from the list and click on the “Update” icon right beside it. Note: – you will see the “Open” icon instead of the “Update” one if your App is already up to date.
  • Finally, wait for the process to complete and you’ve successfully updated your Instagram App.

This way you can update Instagram app on any of your smart devices.

Also, video tutorial that will step by step guide you to update your existing Instagram App:

Explore Old Google Analytics Data and Export Them

How To Explore Old Google Analytics Data and Export Them?

Universal Analytics will no longer process new data in standard properties beginning July 1, 2023. Prepare now by setting up and switching over to a Google Analytics 4 property.
We have created tutorial video on that how you can setup New Google Analytics 4. Go Check out in our another video or Evergreen Tech Tips Blogs Post. Also, we will put a video in it here in the post as well. Today, we will guide you how you can explore old Google Analytics Data and Export them.

To Explore Old Google Analytics Data and Export Them, please follow the steps mentioned below:

Step 1: Go to link and visit analytics.google.com/analytics/web and login to you proper linked Gmail account.
2nd Step: After that select your Analytics Account>Properties & Apps and All Website Data
Step 3: As shown in the video you can now go to Sections Audience, Attribution, etc.
Step 4: Filter or select date as per your need. Here, we are sorting out since the website was launched from Custom option.
2nd Last Step: After the data load finishes, tap on export. There you can export in different formats like PDF, Google Sheets, Excel XLSX or CSV.
Similarly, you can download all other section report.
Final Step: Go check out and explore your downloaded file and keep it safe for future use.

Also, we have covered the videos showing you all the step by step guide. Go check out.

This way, you can view or explore all you old Universal Analytics of any website. And, you can export those reports in any format you like. In the mentioned video, we have exported the report since beginning to a PDF format. You can export the Old Google Analytics Data in any other formats like CSV or excel.

Useful Tech Guide: What Happens When You Block Someone on Your iPhone?

Hope this tutorial was helpful for you. We will cover new useful tech tutorial guide and tips on next topic soon. You may subscribe our YouTube Channel Evergreen Tech Tips too for the latest tech videos.

What Happens When You Block Someone on Your iPhone

What Happens When You Block Someone on Your iPhone?

Almost everyone at some point has or wanted to block someone through their iPhone for various reasons. And, many people still wonder what would happen to those people after we’ve blocked them. So, we’ve created a simple article to teach you on “How to block someone?” and what happens afterwards. Let’s get started.

Blocking Someone on Your iPhone:

For starters, your iPhone doesn’t care about the person that you’re blocking. It’ll completely shut their number from reaching our device through Text Messages, Calls, FaceTime and others. However, those users can still contact us through third party Apps like Instagram, Twitter, and Facebook etc. Here, you need to manually block them from these apps to stop them from reaching out to us. As such, they are a talk for a separate time.  In the meantime, let’s learn about the steps through which we can block someone from our device.

The steps for blocking any number on your iPhone is pretty easy and straight forward. Simply, locate the number that you want to block from your recents or contact lists. Next, click on the info button shown at the right side of that number. After that, scroll down to the bottom and choose the “Block this Caller” option. Here, the iPhone will prompt you to verify the block and you simply have to select “Block Contact” to finalize your Block. This will immediately block that particular number from contacting you in your iPhone.

What happens When You Block Someone on Your iPhone?

A blocked number can experience different results based on the app used to contact you. Similarly, the blocked number will not know that they are blocked. Generally, they only experiences strange instances when they try to contact you on your iPhone. Some of the most common effects of a “Block” are listed hereafter:

  1. Text Messages

When a blocked contact texts you on your iPhone, their messages are sent but you won’t receive them. Similarly, they also won’t get any notification for read or delivered for their texts. Likewise, you also can’t see or reply to those texts from your iPhone.

Useful: iPhone 12 Pro The Ultimate Camera and Photo Setting Tutorial

  1. FaceTime

FaceTime is another app that is affected through the “Block” that you set for a particular number. Now, a Blocked contact will experience an endless ring without any answer when they try to contact us. Also, we won’t get any notifications and the FaceTime will continuously ring until they give up on their calls.

  1. Calls

A blocked number’s call on our iPhone will immediately redirect into our Voicemails. It’s their only clue that they are blocked and they may experience as if our iPhones are turned off. As such, they can leave a voicemail but it won’t show as our regular messages. Instead, we’ve to manually scroll to the bottom of the Voicemail window> Blocked Messages to access them.

Solved Windows Update Error encountered 0x80070422

Windows Update Error encountered 0x80070422 Solved

You might face this issue Windows Update Error encountered 0x80070422 while you try to install software on your PC or Laptop. You won’t be able to install third party software as well as you won’t be able to update your Windows OS too. Hence, its a must that you have to solve this issue as soon as you can. But don’t worry, we are here for you. You will learn all step by step here to solve this Windows Issue.

Steps to solve Windows Update Error encountered 0x80070422 are as follows:

  • First Step: You need to tap on Windows icon and search for Windows Services “Services/App”. Open it normally or right click and Run As Administrator.
  • Second Step: Search for Windows Event Collector. Open it and set Startup Type Automatic and Tap on Start at Service Status. And Apply and OK Changes.
  • Step Three: Same steps again for Windows Event Log.
  • Step 4: Same steps again for Windows Update.

After you have followed all those steps, go to Windows Menu again and Search for Updates or Windows Update Settings. Tap on it and also tap on RETRY. Wait for a while. BOOM!! Windows Update is working Now.

Might Be Useful Too: 100 Percent Fix Installation failed: Destination folder already exists issue

Download and install multiple downloads and you are good to go. You might get multiple downloads, its better to download and install them all. Please note that Plugin the power cord if you are doing it in Laptop. Because, if the power goes off, your Windows might get crashed. Also, you must need speed internet and patience to do it. SSD C:Drive is highly recommended. It is fast in the SSD or Solid State Drive.

For your convenience, we have made a tech tutorial on it too. Visit our Channel Evergreen Tech Tips or watch the tutorial video below:

How to Use your iPhone 13

How to Use your iPhone 13 Pro / 13 Pro Max! (Complete Beginners Guide)

The iPhone 13 and the 13 Pro Max are Apple’s current generation flagships showcasing the best that Apple has to offer. Similarly, there are feature packed and bring major improvements from their older siblings, the iPhone 12 series despite having similar form factors. As you can tell, Apple has done many under the hood changes to provide additional features to its users without many changes to the devices exterior appearances. So, we have created a Beginners guide on How to use your brand new iPhone 13 pro/max to its fullest.

Beginners Guide to Use the iPhone 13 Pro/Max

Before we get started on the software side of the device, let’s have a quick run down into its physical specs and then start from there on. As you hold you brand new iPhone 13-Pro/Max, you can find that the notch on this device is smaller than its older siblings. However, the rest of the hardware still remain unchanged from the previous models like the volume button, mute switch, the lightning ports and the number of lenses on the back. Similarly, both the iPhone 13-Pro/Max also supports wireless charging through Mag-Safe and all its accessories.

Initial Setup process:

Now, let’s move to the software and the working features of both of the devices. Right from the start, Apple provides some of the best set-up guides to guide users through their setup process. Here, this step is very detailed and users shouldn’t have any trouble setting up their brand new devices.

iPhone 12 Pro The Ultimate Camera and Photo Setting Tutorial

The Lock-screen:

After the setup process, let’s move to the lock screen section of your brand new iPhone 13-Pro/Max devices. Here, Users can see some basic information’s like the time, date, flash and camera icons with the owner’s current notifications. Furthermore, users can long press their current notifications to find additional information’s about them and various actions that they can take against them.  Next, users can turn on and use both the cameras and the flash from their respective icons shown at the bottom of their lock screen. Users only have to press and hold each icon to use either of those features. Additionally, Users can also access the camera through dragging the lock screen to the left. For exiting the app, Users only have to drag from the bottom of their screens.

The Control Centre:

The Control Centre is an easy access point of various important settings in the device like the Wi-Fi toggle, brightness toggle, signals, Bluetooth etc. Users can access the control Centre in their respective devices by swiping down from the top right corner of their iPhones. Now, they are shown many setting for their devices that they can change to their likings. Some of the most useful one includes the Airplane mode, device orientation, brightness, Music, flash and signal settings like Wi-Fi, Bluetooth etc. Users can easily change all those settings from the Control Centre itself.

The Home-Screen:

To get into our home screens, Users only have to swipe up from their respective lock screens. Here, we’ll have to enter our respective passwords to get into our home screens or the Face ID will unlock our device for us. In the home screen, we can find all of our apps and widgets that we have installed on our device. Also, there are many homepages and one can access them through swiping left or right on their devices.

For adding additional widgets, Users can swipe to the left until it shows the iPhones widget panel. Here, users can hold and move a Widget to drag it into their respective homepages. This takes us to the “Editing Mode” in our iPhones and we can swipe up to save all our changes. Next, we can also hold down in an app or widget icon to get into the editing mode as well. For deleting and removing both apps and widgets from our home screens, we can tap on the Minus sign above those icons to do so. Also, Users can swipe their home screens to the far right to reveal their App library. The App library consists of all the apps currently installed in our devices.

The Navigation:

All current generation iPhones use gestures to navigate throughout their UI. Here, users are greeted with a navigation bar at the bottom of their screens when they open any Applications. For getting back into their home screens, users just have to swipe that navigation bar up. Additionally, Users can cycle between their recent apps through either swiping their navigation bar to the left or right. Similarly, users can access their multi-tasking menu by dragging the navigation bar and holding it until they see other apps and lifting it up afterwards. This will show us all our recent apps that are open in the background and users can swipe them up to close them.

These are the basics and anyone can get used to their iPhone 13-Pro/Max easily through them. Additionally, users can also start using other apps and setting in the phone to know about them more deeply. After that, they can pretty much mix and match various settings in their phone to their own likings.

iPhone 13 and 13 pro the Ultimate Camera and Photo Setting

iPhone 13 and 13 pro the Camera and Photo Setting Tutorial | iOS 15

The iPhone 13 and the 13 pro are some of the best camera phones that money can buy right now. They combine Apple’s excellent hardware and software features to snap great looking picture anytime anywhere. Although their camera hardware’s haven’t changed much from their older siblings, they bring many under the hood improvements and changes that significantly increase their camera capabilities. Considering this, we have created the ultimate iPhone 13 and 13 pro camera and photo setting tutorial for iOS 15 to guide you through its features and changes. So, read this article to the end if you want to use you iPhones camera’s to the fullest.

iPhone 13 and 13 Pro Camera and Photo Setting Tutorial:

As soon as we enter the iPhones camera app, we are greeted with some of the basic controls like the shutter button, last photo taken, camera toggles and more. Similarly, users can switch between several camera modes like photo, videos, portrait and others through swiping right and left in the camera app itself. Likewise, these features are also available for the selfie camera as well.

Camera Modes:

Here, the basic Photo and Video modes are straight forward but there are additional modes like portrait, panorama, cinematic, Slo-mo, time lapse and others with varying use cases. For instance: – the portrait mode is useful for capturing blurred background pictures and cinematic mode is basically portrait mode for videos. Meanwhile, panorama is an ideal mode to capture images with a much wider field of views than the camera lens itself.  This makes it an ideal mode to shoot landscape photography as well. Other features include Slo-Mo which means slow motion videos. Likewise, time lapse mode allows users to capture multiple images at certain intervals which are later fused together to create one single video file.

Shutter button and its uses:

However, let’s start with the basics of the camera app and then move forward to the complicated bits and parts. In the camera app, the shutter button itself has many functions that we can access through certain gestures. For example: – you can click it once for a single picture or swipe the shutter button to the left for taking burst pictures. Similarly, users can tap and hold the Shutter button to take short videos known as “Quick take” or swipe it right to the lock which initiates normal long videos. Also, users can use the volume buttons to take normal pictures as well. Additionally, there is a setting in the camera app that lets users take burst mode pictures through the volume up button as well.

Using the different Camera lenses:

Now, let’s move to the different lenses of an iPhone and their best use cases. An iPhone 13 pro has 3 lenses on its back namely the main, the ultra-wide and the telephoto. The regular 13 has similar camera systems but lacks a telephoto lens. Now, the numbers 0.5, 1, 3x on the camera app all activate different lenses in the phone. For instance, the 0.5 means the ultra-wide lens for capturing wider images and the 1 basically means the standard main camera with normal field of views.

Meanwhile, 3x activates the telephoto lens that can zoom into images for up to 15 times. Here, users can also manually set their zoom level through tapping and holding one of those three numbers. This brings us a slider that allows us to manually set our desired zoom levels. Additionally, Users can also pinch on the iPhone camera app to set the zoom levels as well.

iPhone 12 Pro The Ultimate Camera and Photo Setting Tutorial

Macro and Night mode Photos:

The iPhone 13 and the 13 pro can take macro images through their ultra-wide lenses as well. Here, the feature is activated automatically as soon as the device detects an object that is nearer than 14cms. On the other hand, users can manually turn on night mode in the camera app or the iPhone switches in this mode for low light scenarios. The icon of Night mode sits next to the Flash icon and is easily visible when it’s activated. Similarly during night mode shots, the iPhone uses long exposure time to take beautiful shots. Here, we should keep the device still during the process for best results. Additionally, users can also manually increase the exposure time through the night mode icon for even better results.

Editing Photos in an iPhone

Both the iPhone 13 and the 13 pro come with a built in photo editor as well. Users can access this menu through the “Edit” icon shown below an image taken previously. Some of the basic settings include Auto mode, exposure, Brilliance, highlights, shadows etc. for the users to mess around. Basically, the iPhone automatically optimizes the images for us in the Auto mode. However, its entirely on us to keep the changes or mess around other settings to create our desired results.

Worst iPhones to buy in 2022

Worst iPhones to buy in 2022

Apple’s iPhones are some of the best long term supported devices that are currently available in the market. Also, an older iPhone will probably retain its value for the longest time than any other competing android devices. As a result, iPhones still remain popular even after their launch date and many even prefer older models due to their cheaper price tags. However, that doesn’t mean that we should purchase any old iPhone from the market. In simpler terms, some devices have already reached their end of life while others have poor value propositions for their prices. Considering this, we have created a list of some of the Worst iPhones to buy in 2022 for you to consider.

Worst iPhones to buy in 2022

  1. The iPhone 12/Mini

The first entry on our list starts from the iPhone 12/Mini. And, yes they are great phones and are still excellent phones to use in 2022. And, they will likely be supported for a long time to come. However, the current prices for the brand new devices are much not different from the latest iPhone 13/mini. In simpler terms, a fully featured iPhone 12/mini comes dangerously close to the prices of the current generation iPhone 13/mini. As such, it’s better to purchase the latest generation ones over the outgoing models. Also, they offer better features that the old ones.

  1. iPhone SE 2020

The iPhone SE 2020 is still the cheapest iPhone that Apple currently sells but it’s not a great idea to buy a new one right now. Yes, the phone still has decent specs and performs admirably for the day to day usages as well. But, it has an outdated design and it has the worst battery life amongst all the iPhones currently on sale. Similarly, its next generation is supposedly launching in the coming months and will probably have similar price tags as well. So, it’s better to wait for its newer model or choose the used marketplace for better deals at newer models.

Face ID with a Mask is Perfect Now (iOS 15.4)

  1. iPhone XS Max

Like with the iPhone 12 series, its better it we don’t purchase the iPhone XS Max in 2022 as well. Here, the iPhone 11 pro max is similarly priced and bring many features to the table than the iPhone XS Max. Also, the 11 Pro Max will have better longevity and will be in support for a much longer duration of time. However if you already own one, it’s still fairly capable and you can hold onto one for some more time. Similarly, one can also find better deals at the used market than purchasing one brand new from Apple themselves.

  1. iPhone 8 series

The iPhone 8 series are also some of the worst phones to currently buy in 2022. Also, Apple has officially discontinued their productions as well. As we all know, the iPhone 8 series launched few months ahead of the iPhone X series and had comparatively dull designs. On the other hand, the iPhone X still looks modern and Apple is also currently selling them in the market. Plus, the iPhone X has better hardware across the board making the iPhone 8 some of the worst iPhone to purchase even in its initial years.

  1. iPhone 6 series and all models before that

Finally, you should always steer clear from purchasing all the iPhone 6 series and the models before them. And yes, the devices are still running the latest versions of iOS but they have already reached the end of their life supports. This simply means that those devices won’t get any more updates because their hardware’s are already at their last legs. Likewise for anyone still using those models, it’s time that you upgrade your devices as Apple has no word of supporting those devices any longer.