SD Cards are one of the most accessible and cheap storage devices that are supported across a wide range of devices. Similarly, they come in many storage sizes and shapes that one can choose according to their needs and use cases. Also, their write and read speeds are pretty high and some even support the PCI and NVME interferences as well. Some of the most popular use cases of SD cards include in Cameras, Mobile devices, Laptops, handhelds etc.
Say you just found the perfect SD Card for your device but later found out that you can’t write anything in it. It’s called Write Protection and it can be pretty frustrating as you can’t add or remove things from your SD-Card. Fortunately, it’s easily fixable and we’ve listed the most popular methods that you can use to solve the issue. Let’s get started.
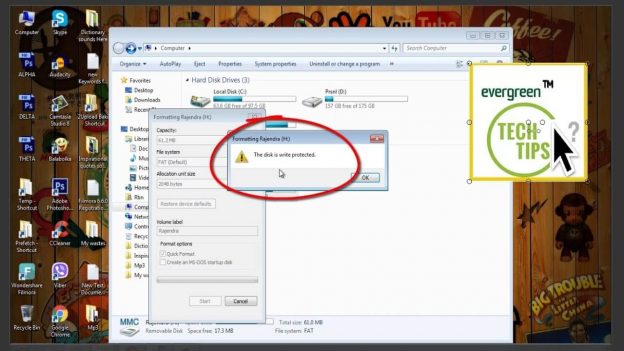
Remove Write Protection from SD Card As Follows:
- Check and Toggle the Physical Switch
The first thing that you need to check when you encounter this issue is to check the physical switch found in your SD Card. And, all SD cards come with this Physical Switch that acts as a locking mechanisms for your data. Now, just remove your SD Card and search for its physical switch. Here, you need to make sure that the slider is at the Top far away from the “Lock” marking. Once you’ve confirmed that, simply insert your SD Card again and this should have fixed your Write Protection problem.
- Check its Properties
Some SD Cards in Windows have a special Write Protection toggle that locks it from any changes. Now, this setting is disabled from factory but you might’ve enabled it accidently. Simply go into the File Explorer and right click your SD Card to check its properties. Here, check if the toggle for Write Protection and disable it if it’s enabled. This will instantly solve your problem. Note: – only Some SD Cards have this option for Windows so don’t worry if you can’t find the option for yours.
Also Helpful: Do This as Soon as You Get an iPhone X
-
Clear the Cards Attributes from Command Prompt
This is the final method that you can use to remove Write Protection if the above methods fail for you. To start, you’ll need a Windows PC or Laptop and signed into the Administrator Account. Next, insert your SD card into the Laptop and follow the steps shown hereafter:
- Right click on the start menu and open the “Command Prompt” as an administrator. Also, you can search for “Command Prompt” from the Windows Search as well.
- Once loaded, enter this command: diskpart and hit enter. Now, confirm the app dialogue that follows.
- In diskpart, enter: list disk This will immediately show all disks connected to your PC. After that, you need to find and verify your SD Card from the available disks. Usually, it’s at the last and has the lowest storage space in the list.
- Now, enter the command: select disk “number” in the command prompt. Here, replace the “number” according to your SD Card’s number i.e. 1,2,3,4 etc. For example: – enter command “select disk 4” if your SD Card is labelled as Disk 4.
- Finally, enter the command: attributes disk clear read-only and wait for the process to complete. You should see the “Disk attributes cleared successfully” message once the process completes. And, you should’ve successfully removed Write Protection from your SD card.